Building An
Intelligent Software Robot
Capable of Learning
UiPath-RPA-Machine-Learning-Workbook-01
“Getting Started”
|
Document Name |
UiPath-RPA-Machine-Learning-Workbook-01 |
|
Version |
DRAFT |
|
Date |
20 January 2020 |
|
Author |
Tony Nudd |
The following tutorial, for Students who are 14-years-old and above, will describe the steps necessary to create an Artificial Intelligence based software robot capable of making decisions based on machine learning techniques.
The workshop is in two parts, this is Part One.
All subsequent workshops will build from Part One (this workshop).
Estimated time to complete this workshop is no more than 3 hours
· A detailed training guide for UiPath RPA (Robotic Process Automation)
· A detailed training guide for Python programming
· A detailed training guide for Machine Learning
· Written for experts
· A step-by-step taster of combining Robotic Process Automation and Machine Learning using UiPath and Python
· A quick introduction to some of the concepts and features of UiPath RPA
· A quick introduction to some of the concepts and features of Python
· A quick introduction to some of the concepts and features of Machine Learning
· A hands-on quick build workshop using some very cool software technologies
· Written for people who just want to get hands-on without too much detailed theory.
· Aimed at 14years of age and over, who have some interest and experience with computers, and preferably, some coding knowledge (but not necessary)
· PC/Laptop with Windows10 installed
· Permissions to install software on your PC/Laptop
· Internet connection available during some of the activities
You need to bring a mix of curiosity and a willingness to learn something new.
IMPORTANT:
Screenshots and images in these workbooks were correct at the time of writing, however new editions and updates of the software you will be using means when you perform an activity results may look slightly different to the images displayed in these workbooks.
Throughout out the workbook the following sections will be encountered:
|
|
What will be covered in this section |

This is a general introduction to the section and the estimated time it takes to complete
|
|
What you will learn |

This is a summary of what will be covered
|
|
Why you need to know it |

This explains why it maybe important
|
|
Let’s Get Started |
This is where you actually do the activities
|
|
What was covered in this section |
This is a re-cap of what you just covered
|
|
Test your knowledge |

Here are some po-quiz questions to test what you have just covered.
|
|
Interesting Fact This section gives an interesting computer related fact.
|
Contents
Introduction to AI, ML, Python & RPA
See finished robot PROJECT in action
The Intelligent Robot You Will Build
Creating the design environment
Test Your UiPath Installation – My First Robot
Adding A UiPath Studio Extension
Test Your Python Installation – Hello World
Python Function and Python Method
Calling The Custom Python Function
|
|
You guide for these workshops is Tony Nudd. Tony is a Robotics Imaginator and he work at UiPath. Originally from the UK, Tony now lives in Australia. Tony has 20+ years’ experience in the Business Automation, workflow and Robotic process Automation space.
UiPath is the creator of UiPath Robotic Process Automation (RPA), a technology which automates repetitive computer-based tasks. UiPath RPA can also be used to integrate and automate several software applications together to save valuable time.
Tony’s
personal RPA projects with Artificial Intelligence include: ·
Training UiPath Software Robots to automatically fly a drone to
count the items on a shop shelf (stock taking)
·
Controlling UiPath Software Robots using mind control through
an EEG headset
·
Using UiPath Software Robots to identify visitors at a Video
Doorbell by incorporating Facial Recognition
|

|
|
What will be covered in this section |

What are the concepts and components being used to create the workshop Design Environment?
Time: 10 minutes
|
|
What you will learn |
What each software component does in the design environment and why it has been included?
|
|
Why you need to know it |

By understanding what each software application does in the design environment will provide a stronger understanding of the capabilities available to you as a designer.
|
|
Let’s Get Started |
Robotic Process Automation (RPA) is defined by UiPath as 4:
The technology that allows anyone today to configure computer software, or a “robot” to emulate and integrate the actions of a human interacting within digital systems to execute a business process. RPA robots utilize the user interface to capture data and manipulate applications just like humans do. They interpret, trigger responses and communicate with other systems in order to perform on a vast variety of repetitive tasks. Only substantially better: an RPA software robot never sleeps and makes zero mistakes.
Artificial Intelligence (AI) is defined in the Merriam-Webster dictionary1 as:
A branch of computer science dealing with the simulation of intelligent behaviour in computers.
The capability of a machine to imitate intelligent human behaviour.
Machine Learning (ML) is defined in the Merriam-Webster dictionary2 as:
The process by which a computer is able to improve its own performance
(as in analysing image files) by continuously incorporating new data into an
existing statistical model.
Python is defined by Eureka.co3 as a high-level, interpreted computer software language which has easy syntax.
High Level
- Python derives components from
the natural language that
we humans use to communicate with each other. This makes it easier for anyone
to try and relate what exactly could be happening without the burden of going
through tons of machine code.
Interpreted
- Python codes are compiled and
executed by the computer line-by-line which makes debugging errors much easier and
efficient. But this comes at a cost as it is much slower than other programming
languages.
Easy Syntax - Python makes use of indentations instead of braces to distinguish what blocks of code come under which class or function. This makes the code look well distributed and makes it easy for anyone to read it.
Intelligent RPA is where the RPA Software Robots can utilise Artificial Intelligence in order to make decisions and so bring even more automation to the scenario.
For example, a
robot could be designed to move emails from the general inbox into certain
sub-folders based on finding keywords in the subject line – this would be
standard RPA.
Intelligent RPA is where the robot, using Artificial Intelligence, moves the
emails from the general inbox to certain sub-folders based on understanding
the content of the email (using sentiment analysis) just like a human
would.
1 https://www.merriam-webster.com/dictionary/artificial%20intelligence
2 https://www.merriam-webster.com/dictionary/machine%20learning
4 https://www.edureka.co/blog/what-is-python/
4 https://www.uipath.com/rpa/robotic-process-automation
Visit here: TBA
In the video you will see the robot:
· A UiPath robot wake-up
· The UiPath robot will communicate with the user who asks a question
· The UiPath robot will run an Artificial Intelligence routine (via Python code) to determine the best possible answer
· The UiPath robot will deliver the answer to the user
|
|
What was covered in this section |
What each software component does in the design environment and why it has been included?
|
|
Test your knowledge |

1. What do the initials RPA stand for?
2. Describe briefly what a software robot does?
3. What do the initials ML stand for?
4. What is the relationship between ML and AI?
5. What is Python?
6. Describe what iRPA is?
|
|
Interesting Fact The world's data storage is estimated to be about 295 Exabytes (that is about 295 billion gigabytes). If all that data was stored on CD, the stack of CD's would stretch all the way past the moon. If all that data was printed out in books, the books would cover the entire area of the US in 3 layers.
|
|
|
What will be covered in this section |

A description of the final project
Time: 10 minutes
|
|
What you will learn |

The capability of the software robot and what components are used to build the robot.
|
|
Why you need to know it |
By understanding what the final Intelligent Robot project is capable of will provide you with a greater understanding of how the overall project fits together
|
|
Let’s Get Started |
The project is in two parts. The first part (this workshop) is creating the design environment with the pre-requisite software. During the installation you will test your software with some mini projects:
· Basic UiPath RPA Robot asking questions
· Basic Python program which joins (concatenates) text strings together
· Basic RPA + Python combined project
In the second workshop, the concepts above are used to create an Intelligent RPA Robot capable of learning from known information and then (through Machine Learning) able to determine answers to questions it has not got data for
PC/Laptop with Windows10 installed
Permissions to install software on your PC/Laptop
Internet connection available during some of the activities
During the workshops you will download and install some free software:
· Chrome Browser
· UiPath RPA
o Various UiPath additional packages
· Python
o Various Python additional packages and libraries
|
|
What will be covered in this section |
Complexities of making different software work together to create a single user experience
|
|
What you will learn |
That each software application has different versions.
Often, we need to choose the correct version mix carefully so the final software environment works the way we expect.
Time: 10 minutes
|
|
Why you need to know it |

Creating a software environment for a particular service or experience is common. Being able to install several software applications ensuring that the versions of that software are compatible with each other is essential.
|
|
Let’s Get Started |
Both at work (school) and at home you will want to bring different software applications together in order to perform a single experience
Example: You might want to play a favourite YouTube video from your mobile device on your large TV display and the sound play via your sound system – in this example software applications from your mobile phone, TV, sound system and internet all have to communicate together, pass data to and from each other in order work the way you expect. If one of those applications does not communicate correctly to the other then you will not get the full experience you desired (maybe you cannot get the video to play on the TV or the sound will not play over the sound system).
Getting different software applications working together (integration) can be difficult.
There many factors involved in creating a single design environment including:
Can data be passed from one application to the other?
· What form is the data in (e.g. PDF, MS Word, Text, Spreadsheet, CSV)?
· How will that data be passed between the applications (e.g. file movement, user input - copy & paste, automated)?
You are probably familiar with MS Word – you will know there are several formats that MS Word can save files in .doc and .docx
Why are there two different formats (.doc and .docx)?
This is due to the main application (MS Word) having new features and improvements (e.g. bug fixes) made to it over time. Each time a new feature is released, a new version of the software is created.
So, as the software product matures, different versions are released with new features (and bug fixes).
The newer .docx file format can contain more information about the document, tends to be a smaller file size and is more robust than the older .doc file format.
You might say to yourself - I will always choose the latest and greatest version because that always has the latest features!
Let us take a scenario - you are asked to write an assignment using MS Word and upload your finished document onto an Online Review system which supports MS Word. Sounds straight forward, yes?
Unfortunately, no.
You are using the latest MS Word application to create your assignments (using the new MS Word .docx file format), but you cannot submit them for review because the Online Review system only supports the older MS Word .doc file format.
Luckily, in the example above the latest MS Word application does allow users to save files in the older .doc format – this is called “backward compatibility”.
Now look at the scenario the other way, you are using the older MS Word, and the online review software only supports the latest .docx file format – you have no choice now except to upgrade to the newer MS Word version in order for the file format to be compatible.
So just because the environment above used MS Word, we had to make sure the “versions” of MS Word we were using was compatible with the other applications to maintain a good software environment which provided a good experience.
|
|
What was covered in this section |
When creating a software environment made up of different applications, not only do we need to check the applications are correct, but also the versions of those applications are compatible with each other.
|
|
Test your knowledge |

1. Why
do software applications have different versions?
2. What is a possible issue if the required version of a certain software application is incorrectly used?
Time: 10 minutes
|
|
Let’s Get Started |
There are a number of browsers available to use for accessing information on the internet. In order to standardise for these workshops, we will use Google Chrome.
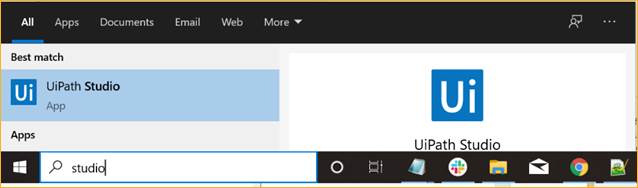
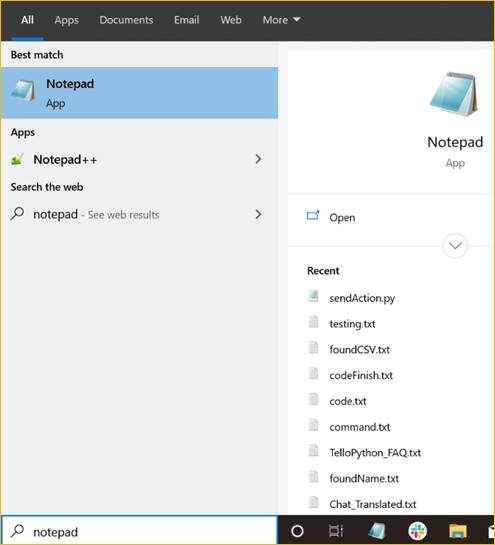
To check if you have Google Chrome already installed, type chrome into your Windows Search box.
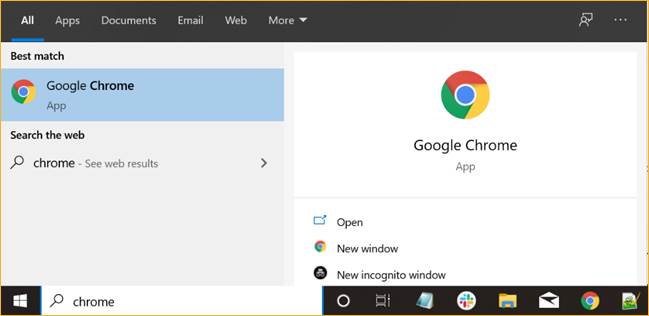
If the Google Chrome App and icon do not appear (see image above) then
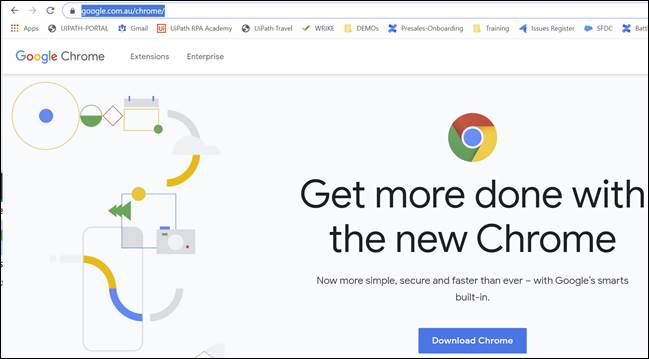
Visit https://www.google.com.au/chrome/
Click on the DOWNLOAD button
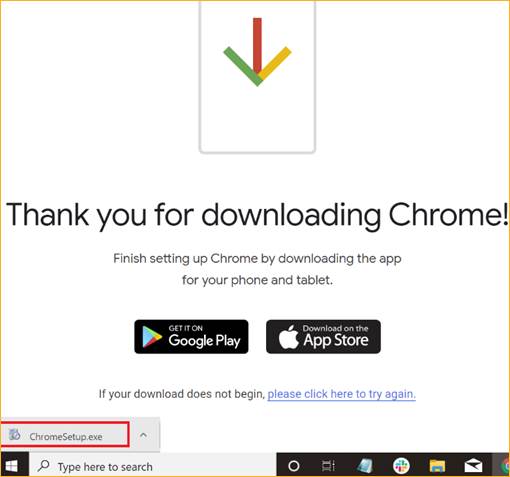
Once the ChromeSetup.exe file is downloaded, run this file.
Accept the conditions of use and allow the software to install.
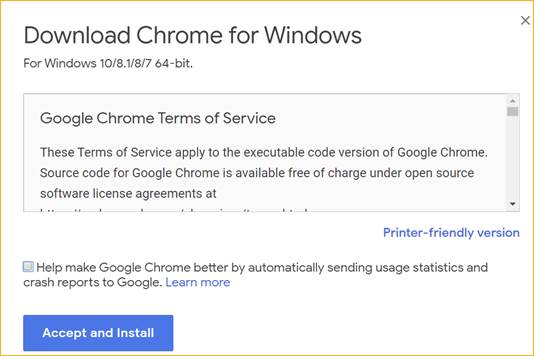
You can close down any Google Chrome windows once
installation is completed.
|
|
What will be covered in this section |

What is Robotic Process Automation
Time: 15 minutes
|
|
What you will learn |

· Who is UiPath
· What is RPA
· Why is RPA important
· How does Artificial Intelligence fit in
|
|
Why you need to know it |

The world is currently in the 4th Industrial Revolution, RPA is one of the driving elements in the revolution. Understanding why RPA is important will show where the future of Information Technology is heading.
|
|
Let’s Get Started |
UiPath is an advanced software application that enables you to design automation processes visually.
The automation is carried out by software robots.
UiPath software robots execute the processes, built in Studio, just as a human would. These software robots can work unattended (run without human supervision) or as assistants (a human triggers and interacts with the robot).
![]() UiPath was founded in Romania in 2005, and in 2019 Ranks the No. 1
Fastest Growing Company in North America on Deloitte’s 2019 Technology Fast 500
UiPath was founded in Romania in 2005, and in 2019 Ranks the No. 1
Fastest Growing Company in North America on Deloitte’s 2019 Technology Fast 500
The Fourth Industrial Revolution represents a fundamental change in the way we live, work and relate to one another. It is enabled by extraordinary technology advances aligned with those of the first, second and third industrial revolutions. These advances are merging the physical, digital and biological worlds. The speed, breadth and depth of this 4th revolution is forcing us to rethink how countries develop, how organisations create value and even what it means to be human.
Robotic Process Automation, Artificial Intelligence with Machine Learning are some of the technologies driving the 4th Industrial Revolution and enabling automation and world-wide connected-ness.
The following is a
high level summary:
First Industrial Revolution - 1770, Steam power and mechanical equipment e.g. Spinning Jenny
Second Industrial Revolution - 1870, Mass production e.g. Ford Motors
Third Industrial Revolution - 1970, Computer Chips (integrated circuits) and the rise of computers & the internet
Fourth Industrial Revolution - 2007, Automation, Artificial Intelligence, Machine Learning & Internet of Things (IoT)
iRPA is “intelligent Robotic Process Automation” a combination of automation using Software Robots with Artificial Intelligence, this workshop will give you hands on experience of building a Software Robot capable of making an “intelligent” decision
|
|
What was covered in this section |
Intelligent RPA from UiPath and the 4th Industrial Revolution
|
|
Test your knowledge |

1. What
is the 4th Industrial Revolution?
2. What
is intelligent Robotic Process Automation?
3. What is an “attended robot” in RPA?
|
|
Interesting Fact In 2019 there were an estimated 8.2 million Python developers worldwide, becoming the second most used programming language behind JavaScript. PhP (another programming language) was 5th most popular.
|
Time: 10 minutes
|
|
Let’s Get Started |
UiPath provides Community Edition (CE) which is free.
Note: It is okay to use the latest available
version of the UiPath Software
(current version at time of writing 2019.10.1)
To install UiPath CE follow the mentioned steps:
1. Go to https://www.uipath.com/developers/community-edition-download and fill up the form 'For individuals and small professional teams'.
2. Click on 'Request Community Edition':
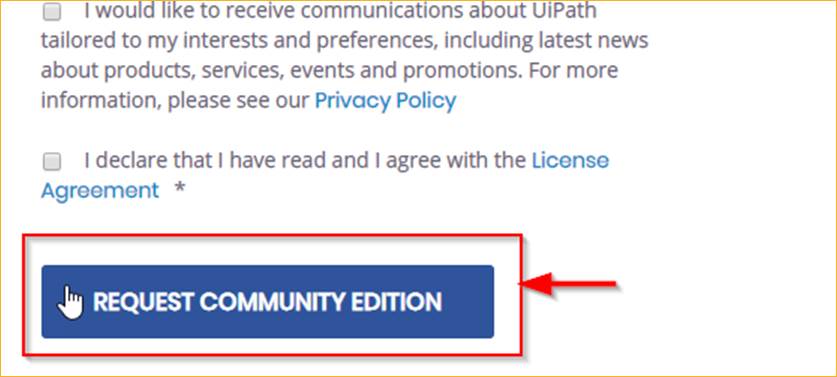
2. Once you click it, you will be redirected to this page.
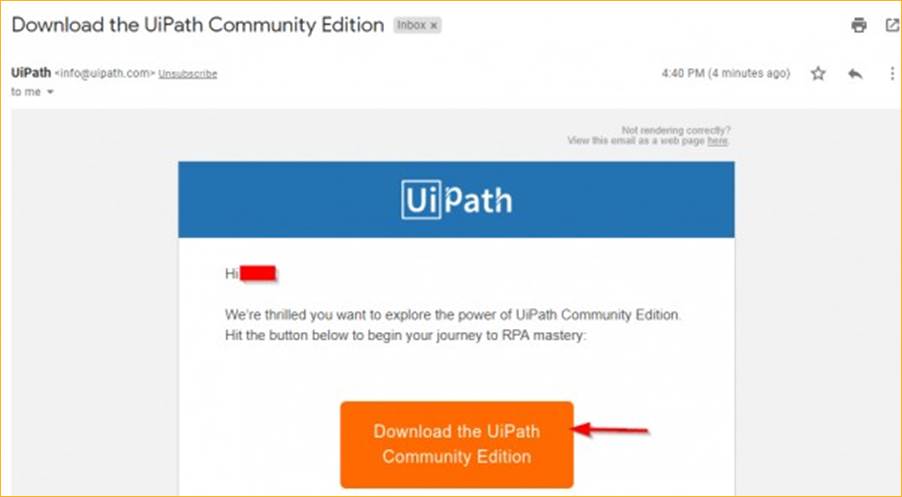
Check your email and get the link to download UiPath CE:

3. Open the e-mail received from UiPath, and click on 'Download the UiPath Community Edition' :
4.Once clicked, the download will start automatically and you can find the 'UiPathStudioSetup.exe' in your default Download folder.
5. Double click on the .exe file and it will open this window:
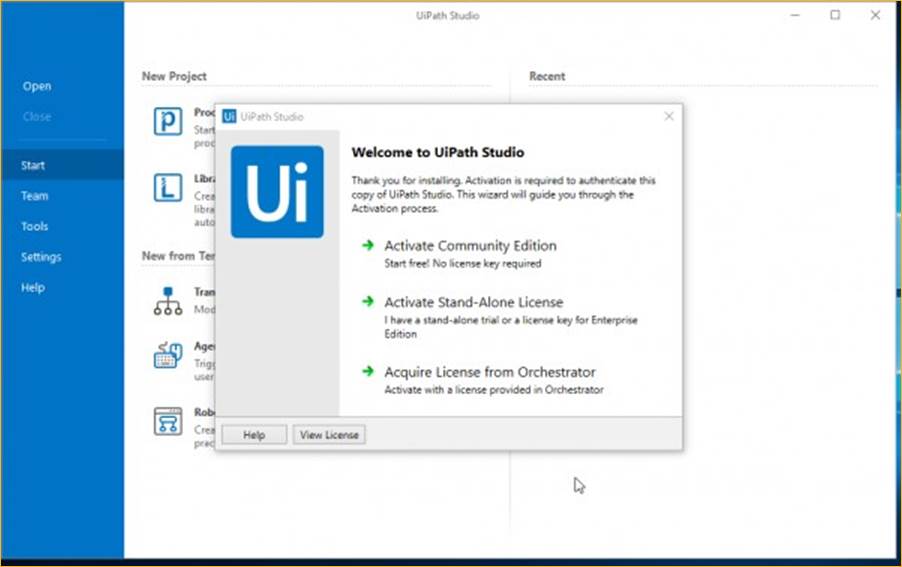
6. Click on 'Activate Community Edition'.
Enter the email id used for registration and click on 'Activate'.
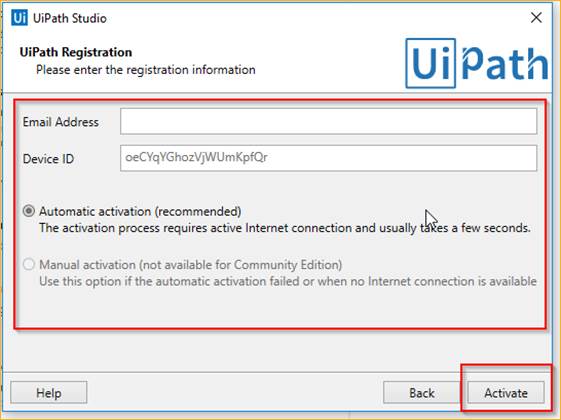
And it’s done!!!
You will get a browser window popped up saying thank you for downloading UiPath and will automatically open the UiPath Studio.
Time: 20 minutes
|
|
What will be covered in this section |

How to open the UiPath Studio Application and start a new UiPath project or open an existing UiPath project.
Create a software robot which communicates with the user
|
|
What you will learn |

· Opening a UiPath Robotic Project
· Understanding where the project files exist
· How to create a new project
· How to add an Extension
|
|
Why you need to know it |

It is important to keep your project files well organised and understand where various project files live on your PC.
The UiPath Studio has plug-ins (or extensions) to help with making the design experience better.
|
|
Let’s Get Started |
If UiPath Studio is not already open, open the app.
You can open an existing UiPath Robotics project

Or, you can start a new UiPath Robotics project.

Select NEW PROJECT – PROCESS to start a new project.
Give your project a name, example: MyFirstRobot
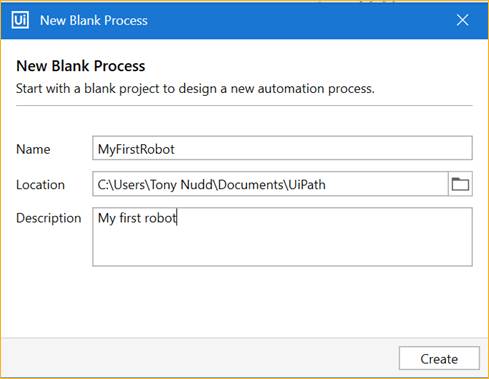
IMPORTANT: Record where your robot project files location is.
Example: C:\users\<Your ID>\Documents\UiPath
Note: Typically, in Windows 10, the directory locations we are using will use “Your ID” as one of the folder names, for example my ID is “Tony Nudd” so my project folder is C:\users\Tony Nudd\Documents\UiPath
Your ID will be different.
So, when you see <Your ID> mentioned in the activities below, it simply means that folder name will be whatever has been assign to you, your name, a unique name, or an ID number etc
On opening, Studio will give a summary of useful shortcuts, click on OPEN MAIN WORKFLOW

Make sure you are in the ACTIVITIES view – see bottom left tabs
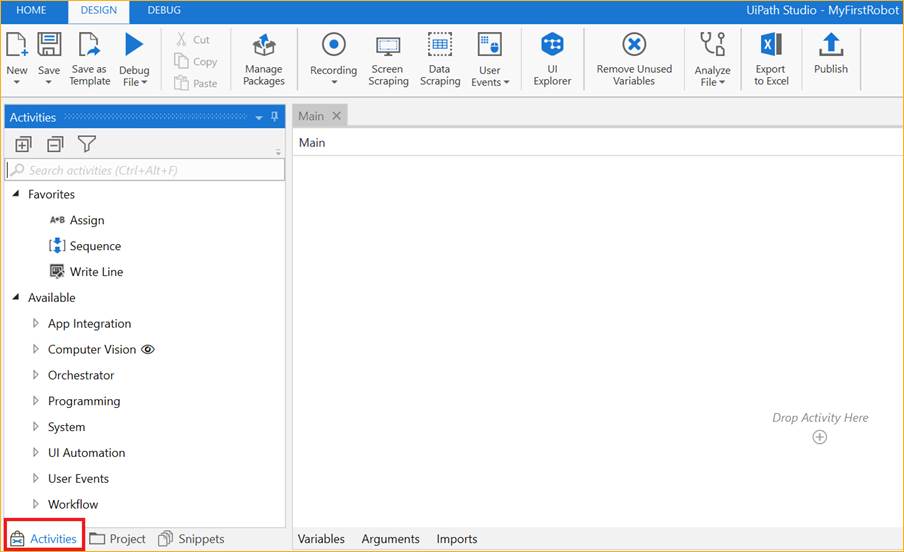
You are now ready to start building a robot.
Just before we build our very first robot, we will a UiPath Extension. These are small plugins to enhance the Studio Design capabilities.
In our projects we may use the Chrome Internet Browser.
We may want our robot to automate work using data from web pages inside the Chrome Browser.
So we will add the Chrome Browser Extension.
Click on HOME from the top menu
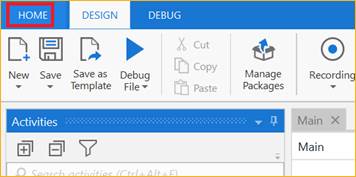
Click on TOOLS from the left-hand menu
Click on CHROME EXTENSION from the right-hand menu
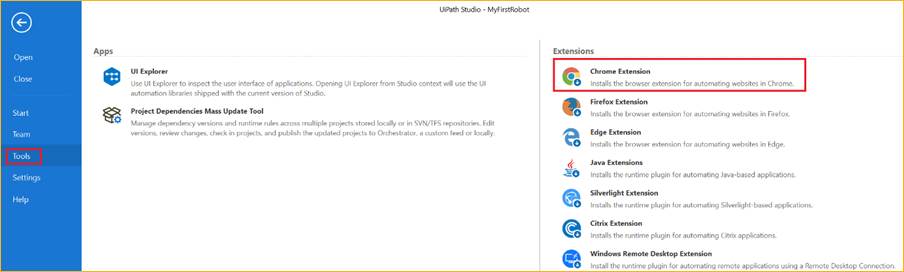
A success message should now appear
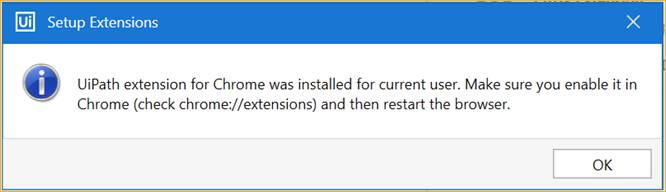
To ensure it is enabled, in Chrome, visit:
chrome://extensions
Ensure the extension is enabled (in the example below the switch is blue – not grey)
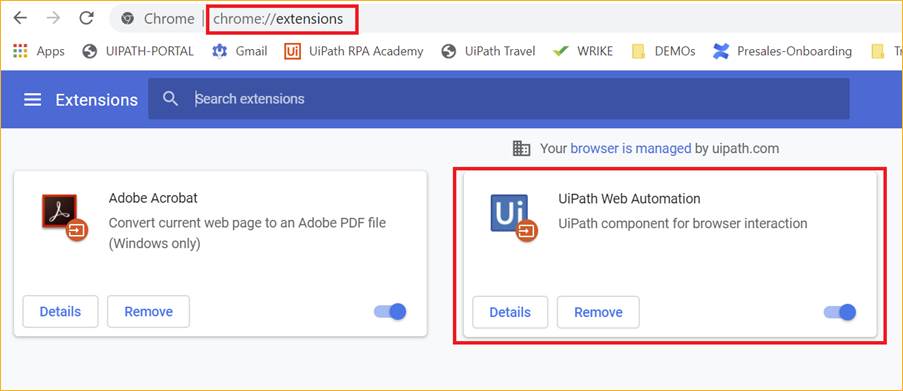
Close Chrome Browser
Click the BACK arrow in UiPath Studio to return to your project
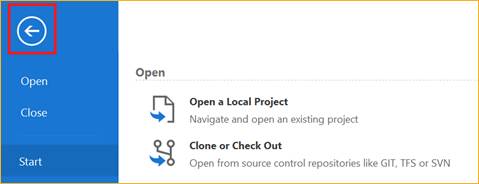
Or close Studio, open again and Open A Local Project “MyFirstRobot”
|
|
What was covered in this section |
Opening a new robot project
Installing a UiPath Studio Extension
|
|
Test your knowledge |

1. Give
an example of the directory location of where your UiPath Robot project is
saved to.
2. Of
the three views available in UiPath Studio (Activities, Project, Snippets)
which is the main view you will be using?
3. What does a UiPath Extension help to do?
|
|
Interesting Fact The word "computer" was first used in 1613 and originally described a human who performed calculations or computations.
|
|
|
What will be covered in this section |

Building a software robot using UiPath Robotic process Automation software.
Time: 30 minutes
|
|
What you will learn |

Using built in Activities in the Studio designer
Creating variables to store data
Setting the Activity properties correctly
Getting information from the user
Displaying information to the user
Adding business logic and decisions using the IF-THEN Activity
Testing the robot
|
|
Why you need to know it |

Building robots can be very agile using the UiPath Studio. The ability to drag and rop Activities in the visual design environment allows for fast design and testing.
|
|
Let’s Get Started |
We will create a simple robot which asks a question and gives an answer.
On the left hand side in the Activities view, are a set of 200+ Activities you can drage across into the design area (middle of the window).
On the right hand side is the properties window for the selected activities.
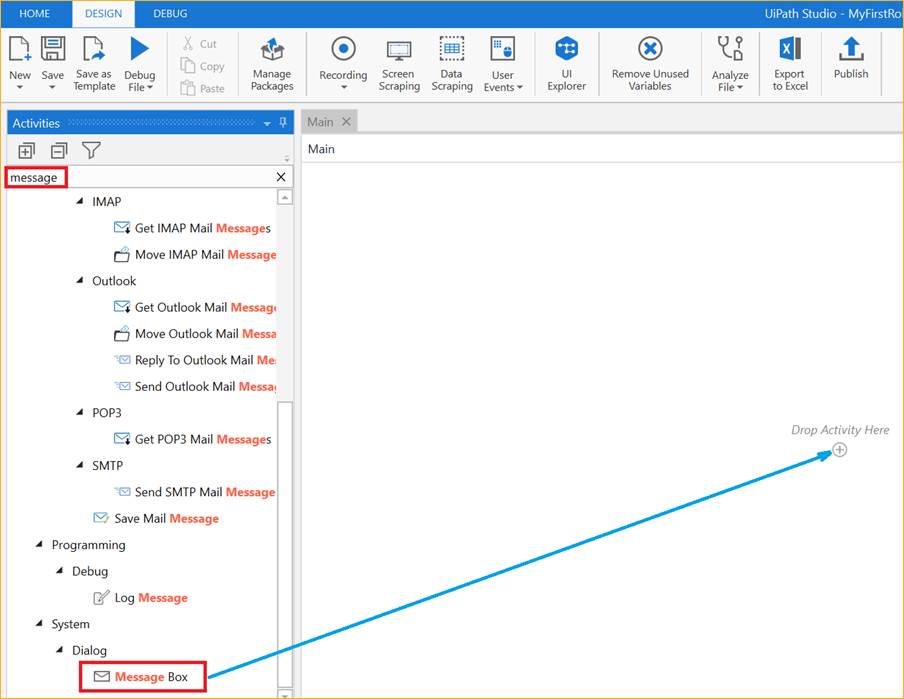
To quickly find the activity you need, simply type its name in the search box.
Search for message
Scroll down to find SYSTEM – DIALOG – MESSAGE BOX
![]() Left-click and hold the Activity then drag the Activity to the design
area and release the
Left-click and hold the Activity then drag the Activity to the design
area and release the
click when hovering over the symbol.
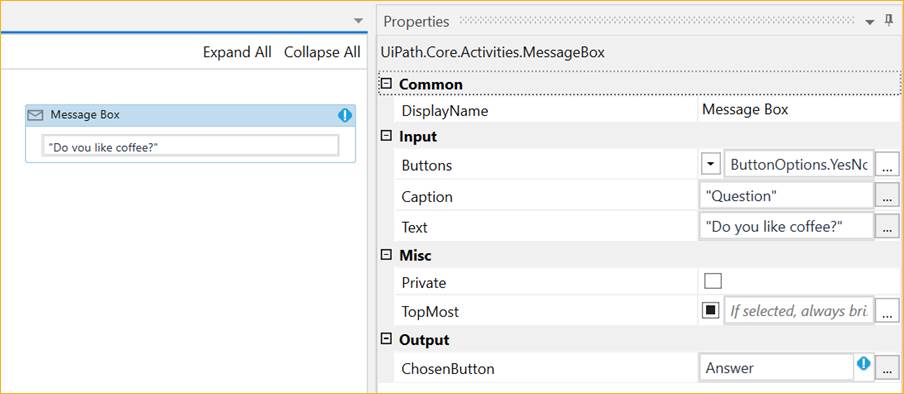
The Message Box properties (see righthand menu when you click on the Activity) should be as follows:
Buttons: YesNo
Caption “Question”
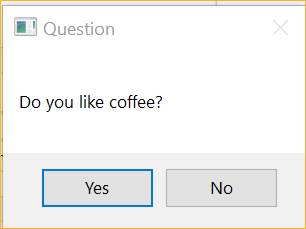
Text: “Do you like coffee?”
ChosenButton: Answer
Important:
Notice that Caption and Text properties must have double quotes “ ” as they are fixed text values.
ChosenButton property value Answer does NOT have double quotes - That is because ChosenButton value is referring to a variable and is not a fixed string value.
Also notice that UiPath Studio is showing a blue and white exclamation mark – this means there is an issue with your design.

Hover your mouse over the blue and white symbol to see the error/problem
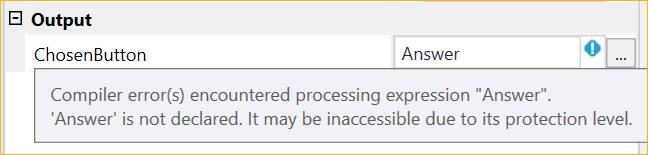
The problem is you have NOT created a variable called Answer yet.
So, click on the tab called VARIABLES
Add a new variable:
Name: Answer
Type: String
Scope: Sequence
Default:

Click on the Variables tab again to hide it.
Notice the blue-white exclamation symbol has now disappeared.
Note: There are many different “data types” a variable could
hold. You have just used “string” which holds characters e.g. myValue = “abc123$%^”,
another “data type” is “number” (or integer, Int32) e.g. myValue = 25
Notice how when we assign (or give) a number value to a number variable we do
not use quotation marks.
Just to be clear myValue = “3” is a string assignment, myValue = 3 is a number
assignment.
Whichever button the user clicks on (Yes or No), its name is put inside the variable we created called Answer.
We now want to find out which button the user clicked.
We therefore need to check the value inside the variable Answer – it will be either “Yes” or “No”
To do this we will use an IF control
Search for “if” in the activities
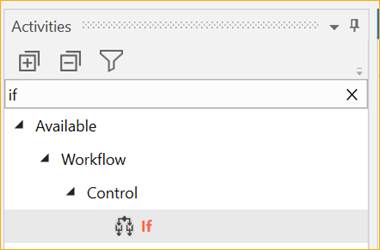
Click and Drag the IF control to under the Message Box
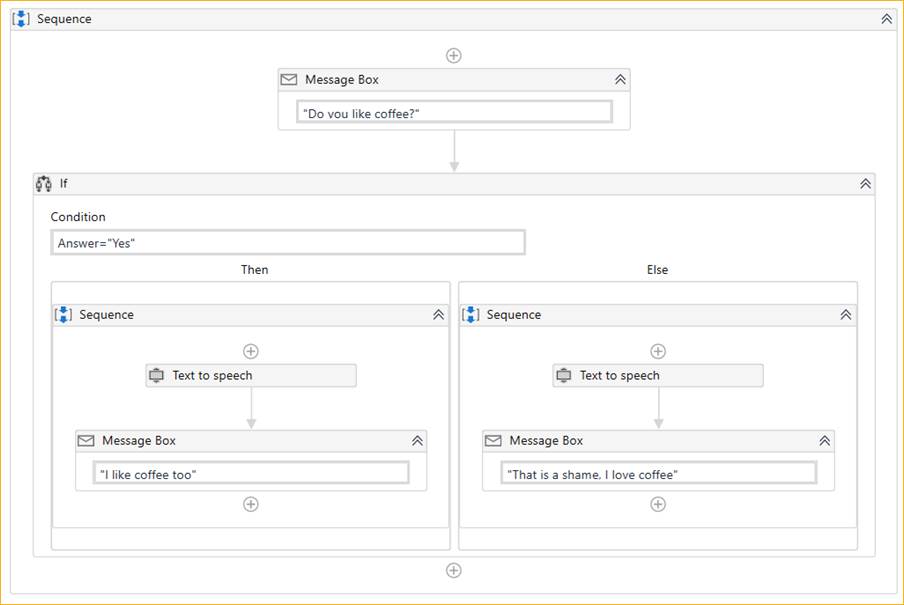
The condition to test for is: Answer="Yes"
If Answer is not Yes, then it must be “No” so no need to test specifically for “No”
Now search and drag a Message Box under each condition THEN and ELSE
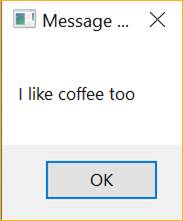
The text in THEN message box should be “I like coffee too”
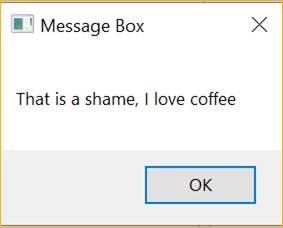
The text in ELSE message box should be “That is a shame, I love coffee”
Your completed robot process should look similar to the image below.
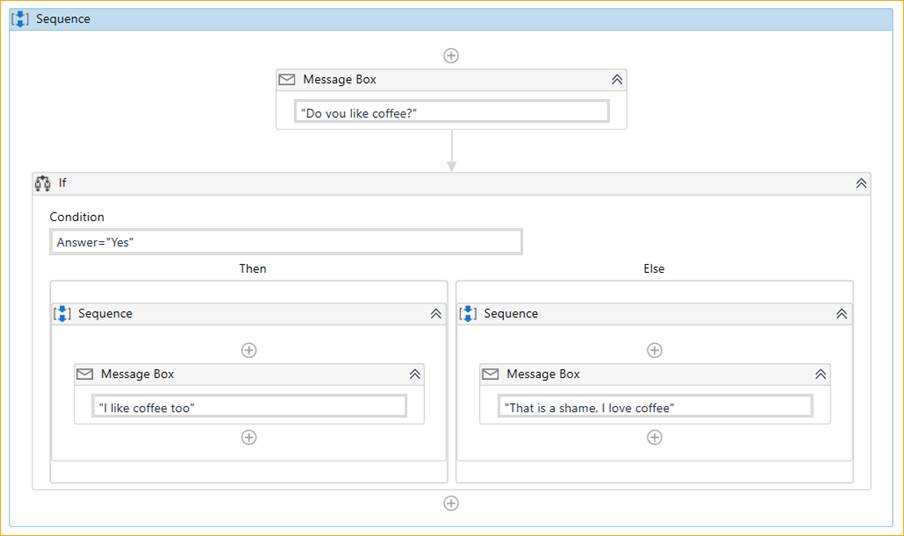
Note: The Sequence Box is automatically added to your design when appropriate.
Let us test the robot.
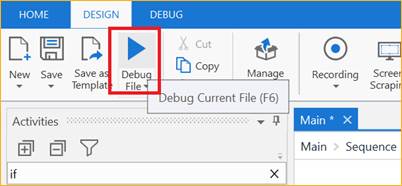
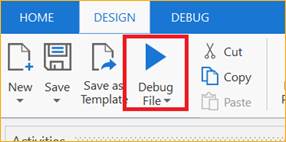
Click on the DEBUG FILE button on the top menu

Wait a few seconds, the robot will start, and the first message box will appear:
Select Yes
The robot then responds
Run the DEBUG again
This time choose No
Notice we get the alternative text response from the robot.
Congratulations, you have created your first Software Robot capable of communicating with the user.
|
|
What was covered in this section |
Using built in Activities in the Studio designer
Creating variables to store data
Setting the Activity properties correctly
Getting information from the user
Displaying information to the user
Adding business logic and decisions using the IF-THEN Activity
Testing the robot
|
|
Test your knowledge |

1. How
does UiPath show there is an error in your design?
2. Give
two examples of variable “Types”?
3. What “type” of data is being held in the variable “myFirstValue”
myFirstValue = “surprise”
4. What “type” of data is being held in the following variable “mySecondValue”
mySecondValue = 25
5. To show some information to the user during robot execution, what Activity could you use?
|
|
What will be covered in this section |

Adding new ready-built features and functions (packages) to UiPath Studio to enhance the capabilities.
Time: 5 minutes
|
|
What you will learn |

How to add “Packages” to the UiPath Studio Designer.
Time: 5 minutes
|
|
Why you need to know it |
Often what you want to do in Studio has either already been built or something very similar is already available. So, the ability to extend Studio with pre-built features and functions allows faster robot configuration.
|
|
Let’s Get Started |
We will create a simple robot which asks a question
One powerful thing about UiPath is that we can share and upload ready made robots and activities.
We will add a new Activity to Studio (which is not part of the standard install).
We call these add-ons Packages
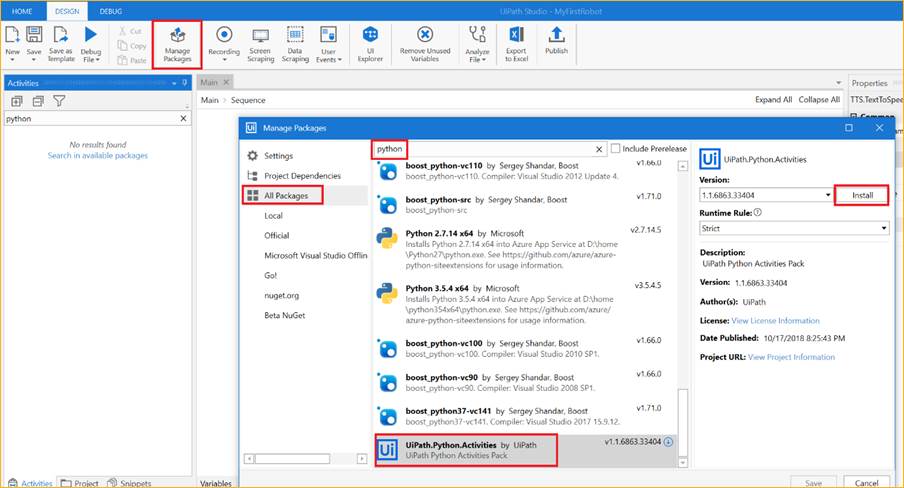
To add a package, click on MANAGE PACKAGES from the top menu.
Select ALL PAKAGES from the new window
Now search for “Voice”
Click on “TTSWithVoiceSelector”
Click on INSTALL to the right of the selected package
Click on SAVE at the bottom of the window.
UiPath Studio will now add this new package. It may take a minute or so to upload and install.
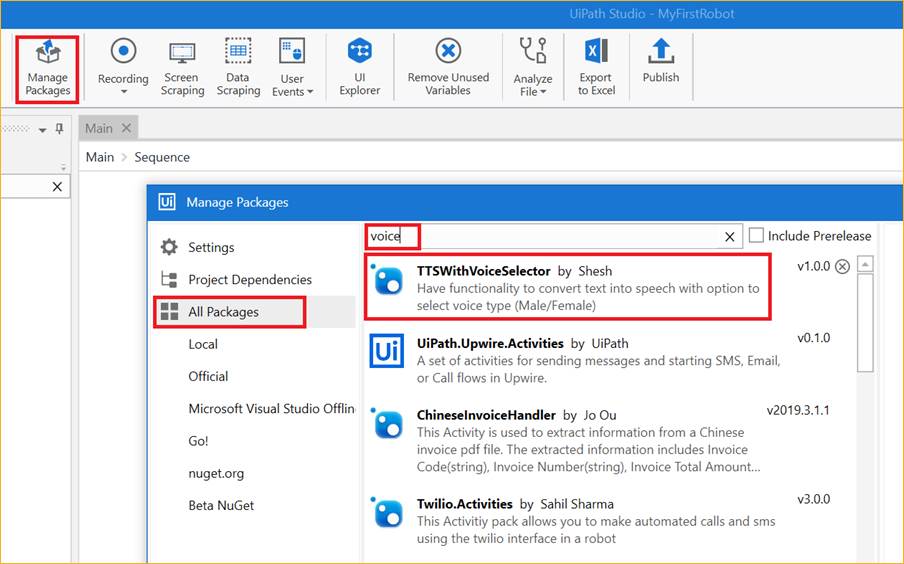
This Voice Package allows our PC/laptop to covert Text To Speech (TTS) – assuming we have sound enabled on our PC/laptop.
Back in our robot project, search the activities for TTS
Change the properties for each activity
Speed: 1
Text: THEN “I like coffee too” or ELSE “That is a shame, I love coffee”
Voice Type: “Male” or “Female”
Volume: 100
Important:
Notice how we put string values in double quotes, but numbers (integers) we do not
Now run your new improved talking software robot.
|
|
What was covered in this section |
Enhancing the standard UiPath Studio with new features and functions (Packages)
|
|
Test your knowledge |

1. When using Package Manager it is possible to filter what packages you can search for, from the selection below, which is the usual filter to select?
a. All Packages
b. Local
c. Official
|
|
What will be covered in this section |

What is the Python
Time: 10 minutes
|
|
What you will learn |
Wat is the Python programming language and why do people use it.
|
|
Why you need to know it |

There are many programming languages available, choosing the correct one for your needs is important.
|
|
Let’s Get Started |
Python is an easy to use software language which has lots of ready-made libraries of functions we can call to save us time in data manipulation. A computer program is simply a set of instructions a computer executes to perform some tasks.
Python is an interrupted software programming language, meaning each line is read, complied and executed at a time by the computer (this is great for debugging, but is a slower than some other programming languages like C++)
The way we write the Python code (the Syntax) is important – but do not worry, most of the time the syntax is in plain English and kind of makes sense.
More important however is the way we indent the code as we introduce things like “loops”.
Note: The standard indent for Python is four spaces
What is cool here is that our Software Robots can call Python programs easily.
Python is “Open Source” which means anyone can contribute to enhancing it with new libraries of cool features and functions.
Many large organisations have adopted Python as their main programming language such as Google, Instagram, Spotify, Dropbox, Disney, Electronic Arts and even NASA.
Many General Scientists and Data Scientists use Python for research purposes.
Learning Python is a great skill to have when job hunting.
|
|
What was covered in this section |
What is Python and why is it popular
|
|
Test your knowledge |
1. Name
some organisations which use Python
2. How many
spaces are in a Python indent?
3. What
is an interpreted programming language?
4. What is one downside to using an interpreted programming language?
|
|
Interesting Fact The Bluetooth logo is the combination of
the ancient Viking rune forms of
|
Time: 10 minutes
|
|
Let’s Get Started |
Windows
Installing Python does not involve much more than downloading the Python installer from the python.org website and running it. Let’s take a look at how to install Python 3 on Windows.
Important: For these workshops you MUST choose version 3.6.8
Step 1: Download the Python 3 Installer
Open a browser window and navigate to the Download page for Windows at python.org
https://www.python.org/downloads/release/python-368/
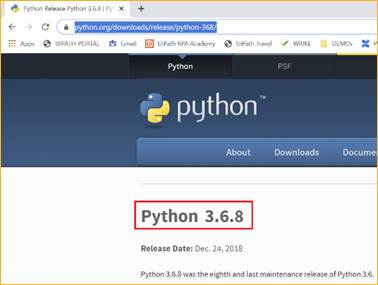
Scroll to the bottom and select either Windows x86-64 executable installer for 64-bit or Windows x86 executable installer for 32-bit.
NOTE: Please use v3.6.8 of Python as this version is tested as working for the examples in this tutorial.
32-bit or 64-bit Python?
For Windows, you can choose either the 32-bit or 64-bit installer. Here’s what the difference between the two comes down to:
If your system has a 32-bit processor, then you should choose the 32-bit installer.
On a 64-bit system, either installer will actually work for most purposes. The 32-bit version will generally use less memory, but the 64-bit version performs better for applications with intensive computation.
If you’re unsure which version to pick, go with the 64-bit version.
![]()
Note: Remember that if you get this choice “wrong” and would like to switch to another version of Python, you can just uninstall Python and then re-install it by downloading another installer from python.org.
You can also have more than one version of Python installed on your PC/Laptop, but this means you have to be very specific when running your Python Programs to ensure you are running under the correct Python version.
Step 2: Run the Installer
Once you have chosen and downloaded an installer, simply run it by double-clicking on the downloaded file. A dialog should appear that looks something like this:
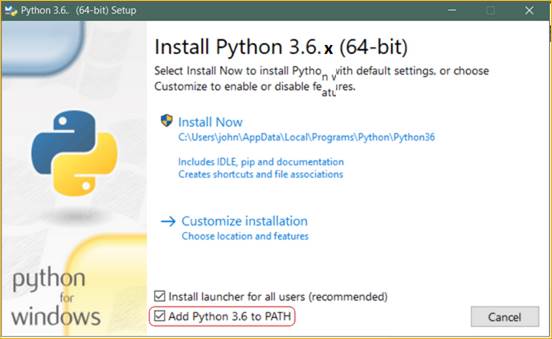
Important: You want to be sure to check the box that says Add Python 3.x to PATH as shown to ensure that the interpreter will be placed in your execution path.
Then just click Install Now. That should be all there is to it. A few minutes later you should have a working Python 3 installation on your system.
Check your Python installation by opening a command prompt in Windows.
Select Windows Menu – Windows System – Commend Prompt
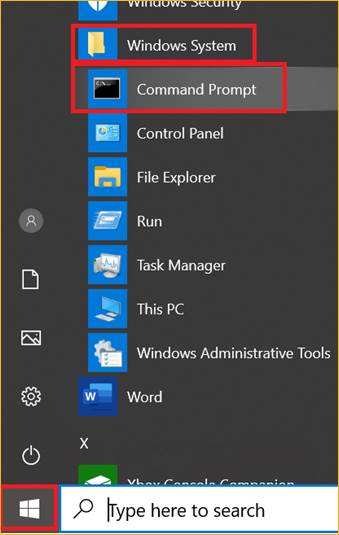
Then type in the Command Prompt window:
python -V
This will show you the version.
If the error similar to this appears:
'python' is not recognized as an internal or external command, operable program or batch file.
This means your Windows PATH is not set.
Navigate to the the Python installation folder using the Command Prompt windows (using the “cd” command – change directory). If your folder names have a space character (like the example below) then put double-quotation marks around.
cd “C:\Users\Tony Nudd\AppData\Local\Programs\Python\Python36”
Then type: python -V
(use a capital V).

This shows Python is installed, but Windows PATH needs adding.
Add the path to the python.exe file to the Path variable, start the Windows Run box
![]()
and enter sysdm.cpl:
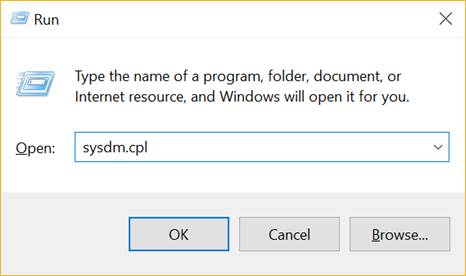
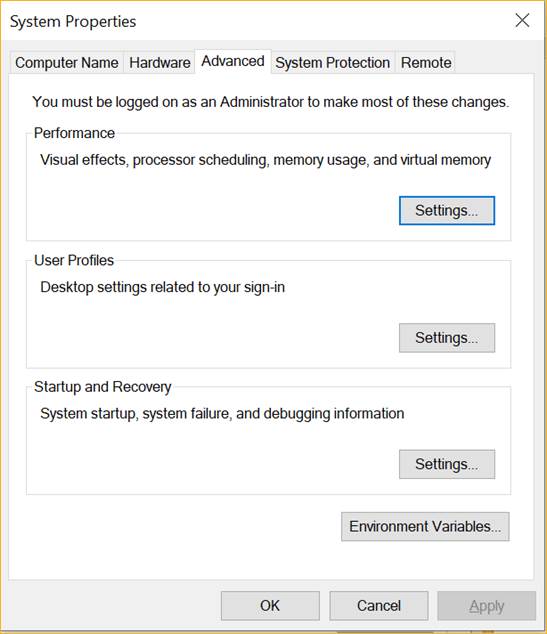
This should open up the System Properties window. Go to the Advanced tab and click the Environment Variables button:
In the System variable window, find the Path variable and click Edit:
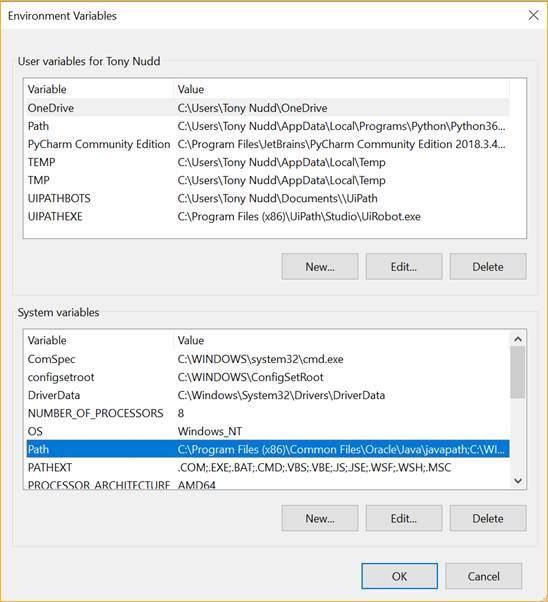
Position your cursor at the end of the Variable value line and add the path to the python.exe file, preceeded with the semicolon character (;). In our example, we have added the following value:
; C:\Users\Tony Nudd\AppData\Local\Programs\Python\Python36\
Close all windows.
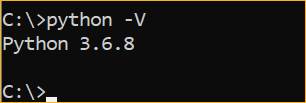
Now you can run python.exe without specifying the full path to the file:
C:>python -V
Python 3.6.8
TIP: Record your Python installation directory, you will need it later.
|
|
What will be covered in this section |
A quick Python script to test you installation
Time: 30 minutes
|
|
What you will learn |
How to use simple tools to create a simple test script in Python.
|
|
Why you need to know it |

While there are many applications to help you get the best out of using Python, we will use some very simple yet useful techniques.
|
|
Let’s Get Started |
An IDE (Integrated Development Environment ) is a coding tool which allows you to write, test, and debug your code in an easy way. IDE’s typically offer code completion or code insight by highlighting, resource management, debugging tools and more.
However, for the projects we will be designing an IDE is not really necessary and so we will use a simple text editor App - Notepad.exe
However, it is recommended you use an IDE for more advanced projects.
Open up the Notepad App from Windows
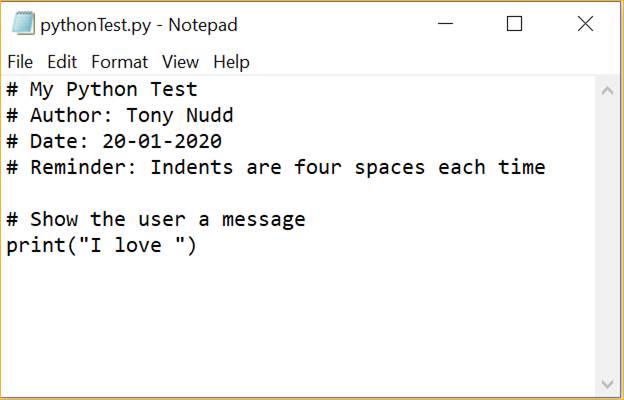
Type in the following in the Notepad window:
# My Python Test
# Author: - use your name here
# Date: 20-01-2020
# Reminder: Indents are four spaces each time
# Show the user a message
print("I love ")
This simple python program will display the text string inside the “print” function.
A function is identified by its ()
Print() displays the text string to your terminal/screen.
The “#” character is to allow for comments, the python interpreter ignores any comments
Notice we have NOT used any indents yet.
Then save this file to your Project Directory - we will use the UiPath Project Directory for now:
C:\Users\<your name>\Documents\UiPath\MyFirstRobot
IMPORTANT: When saving you MUST change the file type in the name, so name the file “pythonTest.py” and ensure you select the *.* option from the Notepad Save As Type selection box.
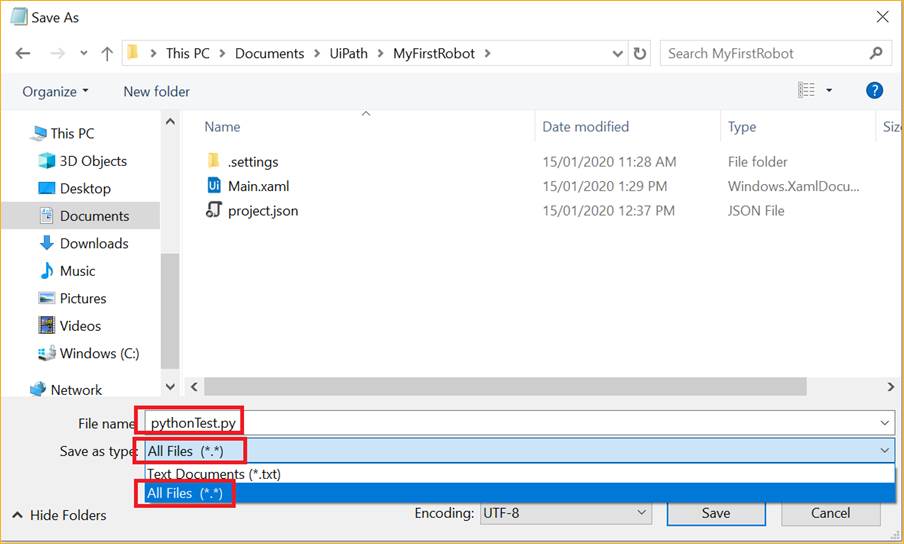
Double check you have a file named pythonTest.py
and not pythonTest.txt
and not pythonTest.py.txt
NOTE:
We will use Notepad.exe to edit our Python files.
If you have closed the Notepad App down, simply re-open it, then select FILE - OPEN from the top menu then navigate to your project directory and find your file.
IMPORTANT: Ensure you select to search ALL FILES (*.*) from the drop down menu near the File Name text box.

We can now test our Python program.
Open up a Windows Command Prompt

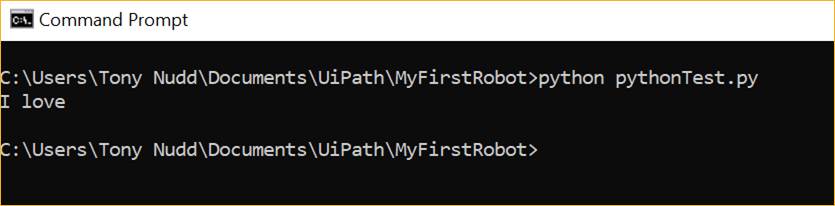
Test Run 1 (fails)
In the command prompt window type “python” to launch the Python interpreter
python
Notice the prompt has changed to >>>
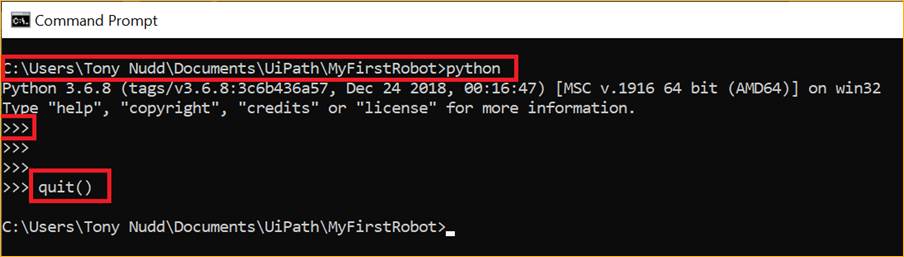
This has opened the Python interpreter – we do NOT want to be here, so type “quit()” then the Enter key (or press the keys Ctrl+z together, let go, then press Enter key). This will return you to the Commend Prompt.
You now know how to exit out of the Python Interpreter if you accidently open it inside the Command Prompt window at any time.
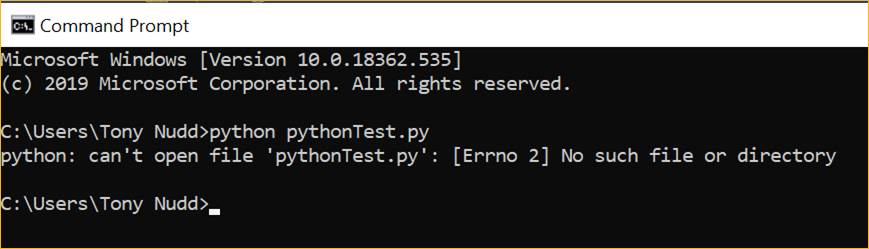
Test Run 2 (fails)
In the command prompt window type “python” followed by your python program name (pythonTest.py)
python pythonTest.py
This will return an error (Can’t open file) because python interpreter cannot find your program (it is not in the current directory)
If you get the following error:
>>> python pythnTest.py
File "<stdin>", line 1
python pythnTest.py
^
SyntaxError: invalid syntax
This means you tried opening your python File while inside the Python interpreter – again, we do NOT want to do this, so type quit() and press Enter key to exit back to the main Command Prompt.
Test Run 3
In the command prompt window type “python” to launch the Python interpreter followed by the python program name – pythonTest.py – with its directory location – inside double quotes.
python “C:\Users\<your name>\Documents\UiPath\MyFirstRobot\pythonTest.py”

You should now get our test message
Test Run 4
In the command prompt window change directory to your where your python program is saved.
cd “C:\Users\<your name>\Documents\UiPath\MyFirstRobot”
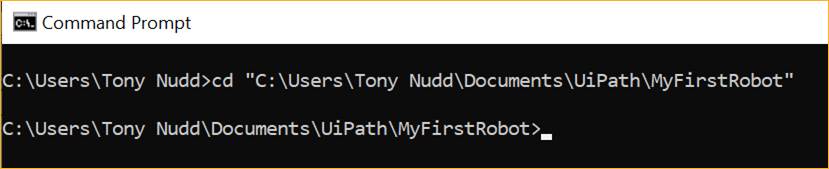
Remember: With directory names that have spaces in them, we need to use double quotes.
Now we are in the correct directory we can run the python interpreter and call our program without the directory name:
You should now get our test message
We have seen how to run a python program in two ways.
We have seen some examples of possible errors when calling a python program.
Our simple python program is working great, but we want to make it more useful by allowing it to be called as a function (a block of reusable code). That is to say, I do not want to keep typing the same lines of code each time I want to show my users this text.
A function can have inputs that are passed to the function (e.g. numbers or strings) and outputs (results) which the function passes back.
Say I wanted to pass the word “robots” to my new function and get my function to add this word to the sentence “I love”, the result (output) I expect would be “I love robots”
|
Send the string “robots” |
Function accepts the string |
Function adds string to |
New string is |
Function returns |
To add a string to another string we use “+”
Adding one string to another is called concatenation.
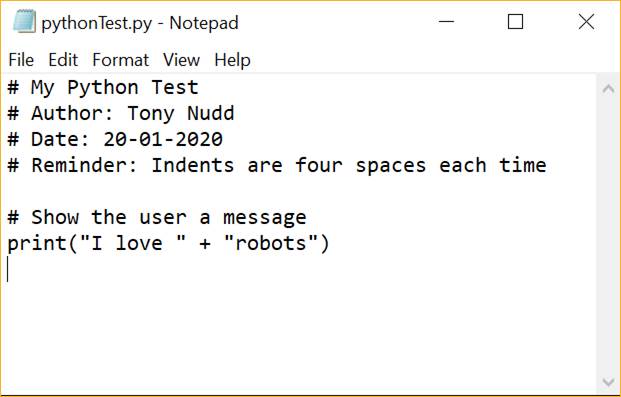
To test this, modify and save your program as below – the changes are shown in red:
# My Python Test
# Author: Tony Nudd
# Date: 20-01-2020
# Reminder: Indents are four spaces each time
# Show the user a message
print("I love " + "robots")
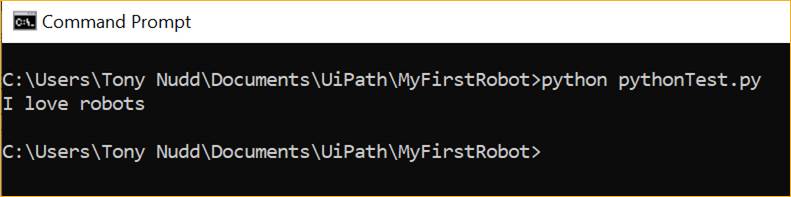
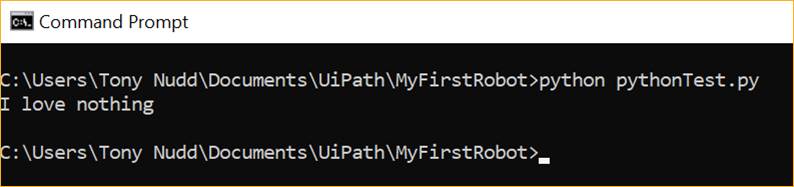
Now run your program:
C:\Users\<your name>\Documents\UiPath\MyFirstRobot>python pythonTest.py
Great, I can now create new combinations but I want to change the words “robots” to any word I choose - I want this function to be dynamic.
So instead of using a fixed word “robots” we will create variable, call it “myWord” which will contain (or hold) my desired string value.
So in your code we will do three things:
1. Replace “robots” for the variable myWord
2. Define our python function using “def”
3. Add a default value to myWord in case the user calls the function without a value
To actually call our new function we use the format function-name(inputs)
e.g. my_message(“robots”)
IMPORTANT: Notice how we are using indents (four spaces) in the code.
Python is strict about indents and uses then to identify what to execute and when, so you need to be accurate in placing your indents.
# My Python Test
# Author: Tony Nudd
# Date: 20-01-2020
# Reminder: Indents are four spaces each time
def my_message(myWord = "nothing"):
# added indents
# Show the user a message
print("I love " + myWord)
# call the my_message function
my_message()
If we pass no words to the function, then the default value for myWord will be “nothing”
i.e. my_message()
The sentence will therefore read “I love nothing”
So run your Python program:
C:\Users\<your name>\Documents\UiPath\MyFirstRobot>python pythonTest.py
Great, now let us try another test, but this time pass a word.
Now pass a word to the function e.g. “robots”
Where we call the function, using double quotes (to tell python we are passing a string) add your word
# My Python Test
# Author: Tony Nudd
# Date: 20-01-2020
# Reminder: Indents are four spaces each time
def my_message(myWord = "nothing"):
# Show the user a message
print("I love " + myWord)
my_message("robots")
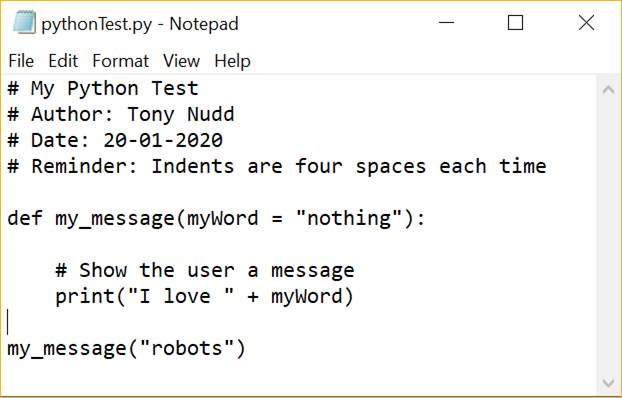
As we did pass a valid string to our function (“robots) the function added this string to the sentence.
In the examples above we are passing values to our function, we also want values returned to us.
We will change the program above so that the “print” is not included in our function.
We use a new variable called myResult which will hold the new sentence.
We take out the “print” function and replace it with the sentence builder (or string concatenation).
MyResult now holds the new sentence, but we no longer show the result to the user as we have removed the print() function.
We add the print function back, but at the end of the program.
We now “call” our new function – my_message
We pass our desired word to the concatenation function – my_message(“robots”)
The concatenation function adds the word to the simple sentence to create the new sentence and holds the new sentence in a variable called myResult
The function then returns the resulting sentence (myResult) back.
We want to print the resulting sentence when the new function has returned the result so we place the my_message inside the print() - print(my_message("robots"))
|
Send the string “robots” |
Function accepts the string |
Function adds string to |
New string is |
Function returns |
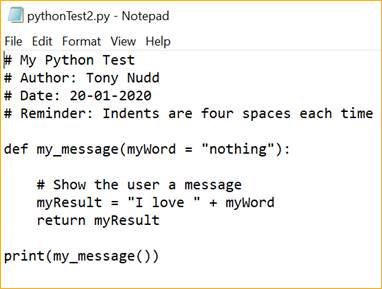
# My Python Test
# Author: Tony Nudd
# Date: 20-01-2020
# Reminder: Indents are four spaces each time
def my_message(myWord = "nothing"):
# Show the user a message
myResult = "I love " + myWord
return myResult
print(my_message("robots"))
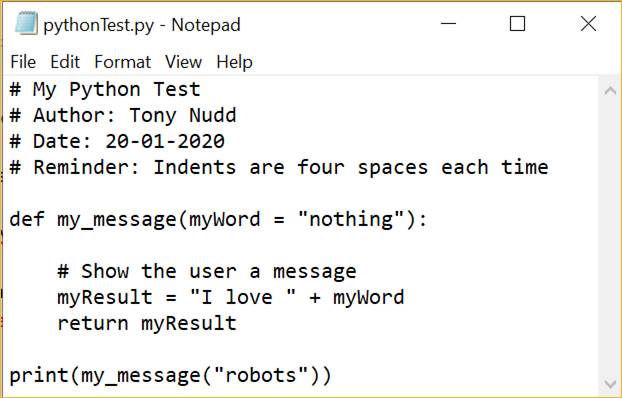
Note: See how we placed our new function call my_message(“robots”) inside the print() function using print(my_message("robots"))
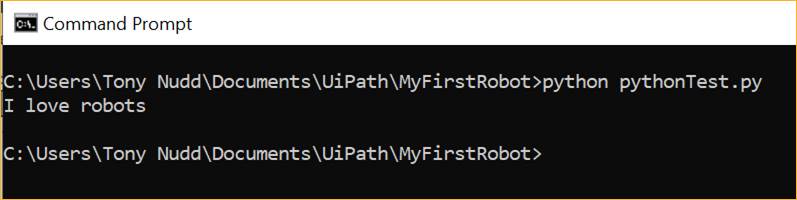
The program above now shows our function which takes an input (a string e.g. “robots”) and adds (concatenates) this string to the existing string sentence “I love “ and finally passes this concatenated string back. The python program then prints out the returned string sentence.
We now have a reusable function we can call to dynamically create simple sentences using different words passed to the function.
One of the most distinctive features of Python is its use of indentation to mark blocks of code. In most other programming languages, indentation is used only to help make the code look pretty. But in Python, it is required for indicating what block of code a statement belongs to.
If you get your indents incorrect you may see the following type of error:
File "pythonTest.py", line 10
return myResult
^
IndentationError: unindent does not match any outer indentation level
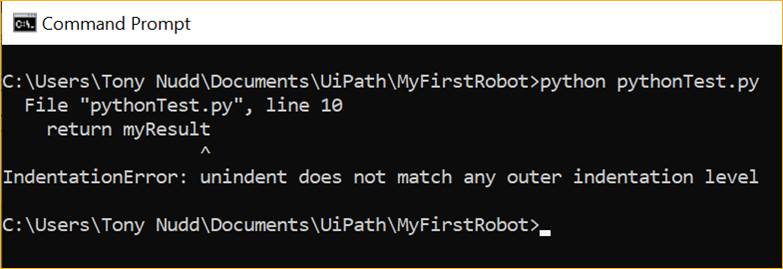
Do not worry, simply check your code near where python is telling you there is an error.
In the example above it is saying there is an indentation error near line 10
In Notepad you can easily view where you are in your program by switching on the “STATUS BAR”
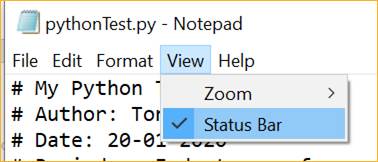
Now you can see the line and column your cursor is currently at.

In the example above, the line “return myResult” is one space mis-aligned.
Simply indent correctly (in this example add one more space character) and the program is fixed.
Save and run.
Simply, a function and a method both look similar as they perform in almost
similar way, but the key difference is the concept of ‘Class and its Object‘.
Do not worry about Class and Objects for now, during the workshop activities python methods and functions can be seen as the same thing.
As you explore Python outside of this workshop you will understand the differences better.
|
|
What was covered in this section |
Using Notepad App to write your Python program
Running your Python program via the Command Prompt window
Using variables to hold data
Creating a re-usable Function
Identifying various possible issues
|
|
Test your knowledge |

1. What
is an IDE, and when would you use it?
2. If
you are in a Command Prompt window trying to run a Python program and your see “>>>”
what has happened?
3. If
you are in a Command Prompt window and you see “>>>” how do you
exit?
4. How
many space characters is in a Python indent?
5.
If you see the
following error “IndentationError: unindent does not match any outer
indentation level” what problem in your code could this indicate?
6. When in a Command Prompt window and you run python myCode.py and the following error appears, “python: can't open file ‘myCode.py’: [Errno 2] No such file or directory” - what could you do to fix the issue?
|
|
Interesting Fact Using the fastest computers available
today, to crack data encrypted with
|
|
|
What will be covered in this section |

Adding Python packages
Time: 10 minutes
|
|
What you will learn |

How to install Python Packages in order to extend the Python environment to include extra feature and function libraries.
|
|
Why you need to know it |

Often complex features and functions have been already written for Python which you can re-use. Adding these packages will make designing your projects simpler and faster.
|
|
Let’s Get Started |
One of the great things about Python is that there are many add-on packages to enhance what you can do. A Python library is a collection of functions and methods that allows you to perform many actions without writing your code. For example, the extended Python imaging library is called Pillow, and one of the main libraries for image manipulation in Python.
The Python Package Index (PyPI) is a repository of software for the Python programming language.
You can add these extra libraries to your Python installation using a function called PIP (the Python Installation Package Manager). PIP allows you to install and manage additional packages that are not part of the Python standard library.
PyPI (in conjunction with PIP) helps you find and install software developed and shared by the Python community.
Usually the actual PIP package can be found here:
C:\users\<Your ID>\appdata\local\programs\python\python36\lib\site-packages\pip
PIP is installed automatically as part of Python 3.6.x
You can see your version of PIP by opening up a Command Prompt and typing in pip -V

NOTE: To install a new package you need to have a internet connection.
So, as an example we will install the Pillow image processing package.
In the Command Prompt windows type: “pip install Pillow”
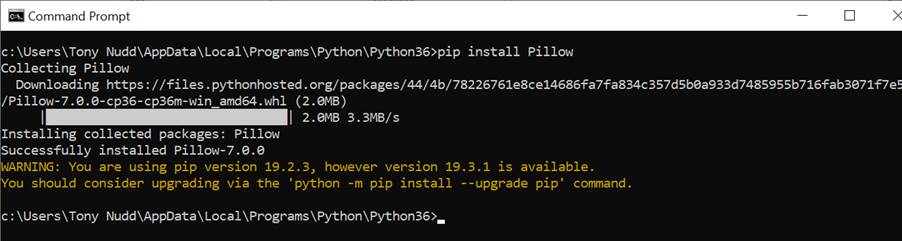
See how easy it was to add a new package giving your Python new features and functions.
We will use PIP more in other workshops.
Also notice you may have got a “Warning”
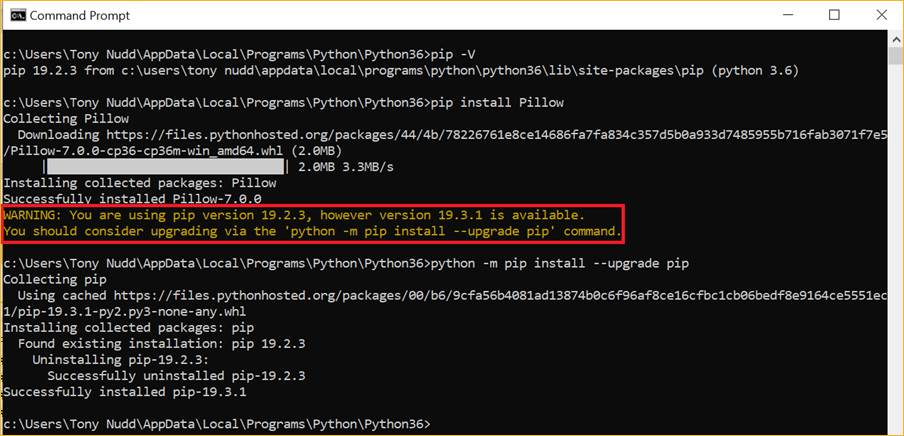
WARNING: You are using pip version 19.2.3, however version 19.3.1 is available.
You should consider upgrading via the 'python -m pip install --upgrade pip' command.
Yes, we do want the latest PIP installer, so while we are in Command prompt, let us upgrade this older version of PIP to the latest version. The warning message tells us how to do this:
python -m pip install --upgrade pip
In the image below you can see how easily we updated from version 19.2.3 to version 19.3.1
|
|
What was covered in this section |
How to install Python Packages in order to extend the Python environment to include extra feature and function libraries.
|
|
Test your knowledge |
1. What
is the command to install a Python Package?
2. Why
is the internet needed to install Python Packages?
3. What is PyPI ?
|
|
Interesting Fact
The first computer algorithm intended to be executed by a computer was designed by Ada Lovelace, the daughter of the poet Lord Byron, in 1843
|
|
|
What will be covered in this section |

UiPath Python Activities to call a Python Function
Time: 30 minutes
|
|
What you will learn |

How to add the UiPath Python Activities Package.
How to use the UiPath Python Activities
How to create a Python Object variable
|
|
Why you need to know it |

You will encounter the need to call custom Python functions with RPA as you explore intelligent Robotic Process Automation (iRPA). Using the UiPath Python Activities allows a flexible way to connect your robots to your Python Artificial Intelligence (AI) and Python Data Science projects.
|
|
Let’s Get Started |
We can now bring the UiPath RPA robots and our Python programs together.
As we have a reusable Python function, our software robots can call this function on demand.
Close all your windows except for the UiPath Studio.
Have your MyFirstRobot project open.
Add the UiPath Python Activities package
Click INSTALL
Click SAVE
Click I ACCEPT if asked to agree to the usage terms
We will now extend the existing myFirstRobot process.
The robot will ask the user “What else do you love”
The user inputs a word via the keyboard.
The robot uses our Python Function to concatenate our given word to the simple sentence.
We need to create a variable to hold the user’s given word.
Create a variable called “iLove” as type String

Search for the INPUT DIALOG activity
Drag the Input Dialog activity into the design area and place it after the IF CONDITION (see image below).
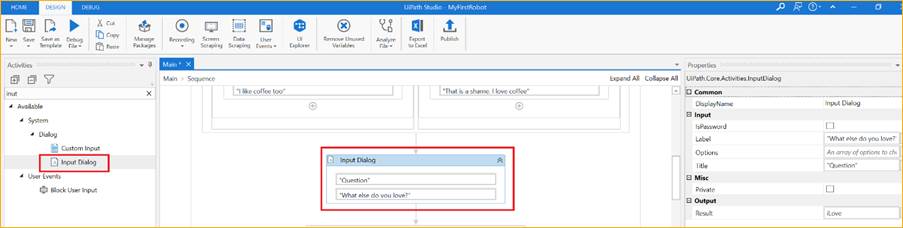
Set the properties:
Label: “What else do you love?” (use double quotes as this is fixed text)
Title: “Question” (use double quotes as this is fixed text)
Result: iLove (do NOT use double quotes as this is referring to a variable)
Search for “Python” in your Activities list (right hand side of Studio).
Calling A Python Function In 4 Easy Steps
1. Define the Python Scope
2. Load the Python File
3. Invoke the Python Method
4. Get the Python Object
This is simply telling the robots where the Python interpreter is located.
Drag the PYTHON SCOPE activity and place it after the IF CONDITION (see image above).
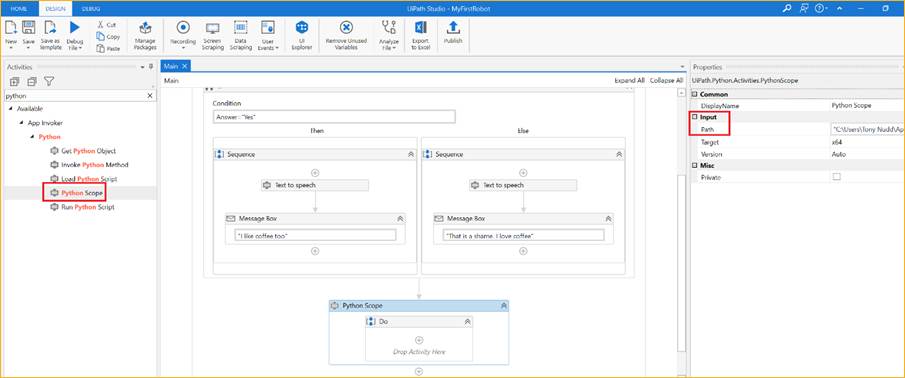
The Python Scope tells the robots where the Python Interpreter is installed, so you need to add the Python installation directory to the PATH property:
C:\Users\Tony Nudd\AppData\Local\Programs\Python\Python36\
Windows10 is typically on a x64 platform, so set the TARGET property to x64
I cannot remember where I installed my Python Interpreter!
So open the File Explorer App
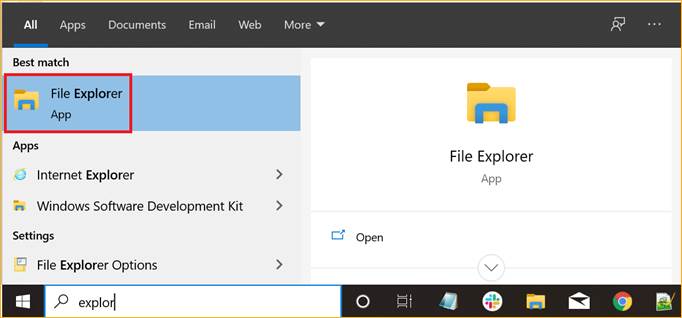

Search your Windows (C:) ) Drive (select it on the left hand side).
In the Search Box in the top right, search for “python.exe”
Wait for your PC/Laptop to finish searching.
Right-Click the entry you are interested in and select Open File Location.
You may have multiple results, however, look for something similar to:
“C:\Users\<Your ID>\AppData\Local\Programs\Python\Python36\”
You may have to try several entries to find the correct directory.
Next drag inside the Python Scope Do area a Load Python Script – this tells the
robot which python program it will use.
We want to give this loaded file a UiPath variable name so we can reference it later, so create a new variable.
Name it “pyLoadedFile”
Then click BROWSE for the variable type
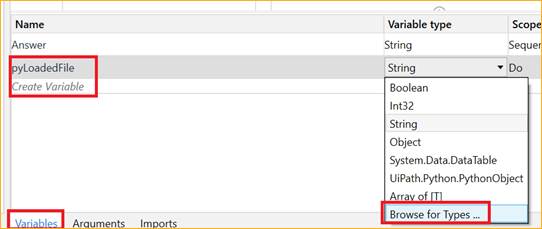
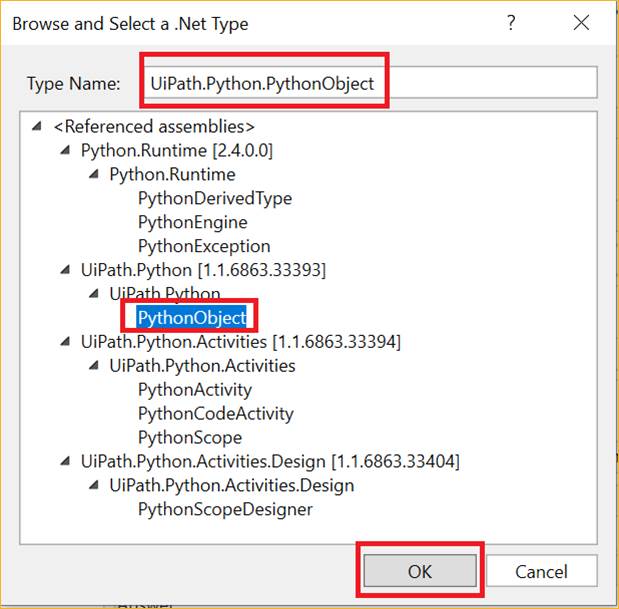
In the Type Name, search for “python” to filter the list, then select UiPath.Python - PythonObject
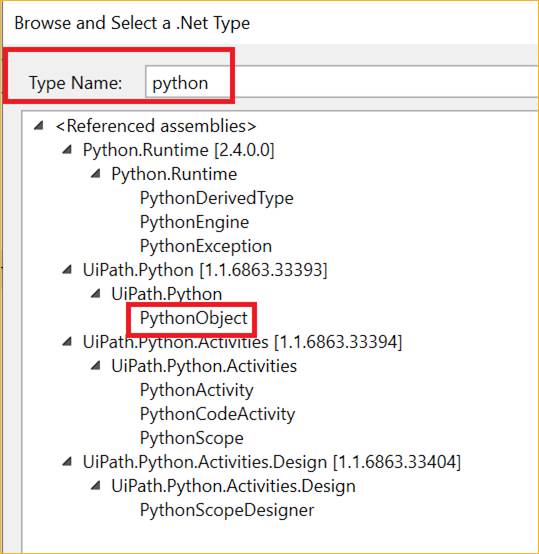
Select UiPath.Python - PythonObject
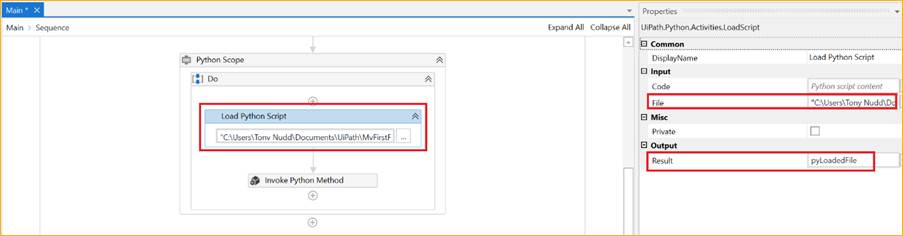
For the property FILE:
"C:\Users\Tony Nudd\Documents\UiPath\MyFirstRobot\pythonTest.py"
For the property RESULT:
Use the variable name you created above - pyLoadedFile
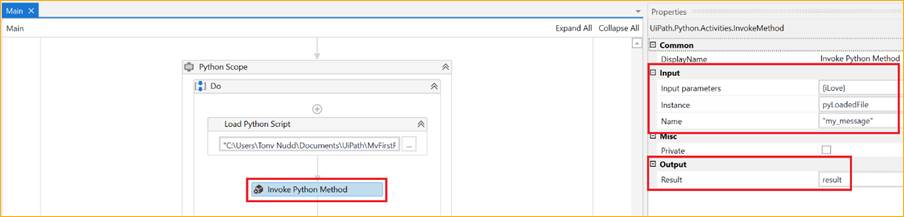
Next we tell our software robot what the method (or function) inside the Python
program is called.
Our custom Python function was called “my_message”
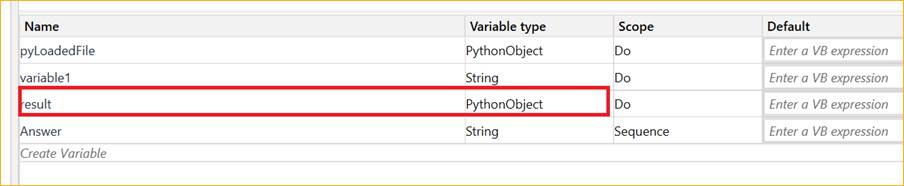
When the Python method returns the result (our completed sentence) we need to store it somewhere – so we will create a variable called “result” which is of type PythonObject (same type that we used above when configuring Load The Python File).
Create variable called “result”, variable type PythonObject
The custom Python function we are calling expects an input string. We want to pass it the value of the “other Thing we love” – we put that value inside a variable called iLove.
When passing Input Parameters, we need to surround them with curly brackets { }
We are only passing one input parameter in this example.
So, for the Invoke Method properties:
Input Parameters: {iLove}
Instance: pyLoadedFile (do NOT use double quotes as we are referring to a variable)
Name: “my_message” (use double quotes as we defining the name in our custom Fundtion)
Result: result (do NOT use double quotes as we are referring to a variable, i.e. its contents)
You will have noticed in the UiPath Studio Variables section that there is something called “Scope”.
![]()
Scope can be seen as where in the project an Activity is.
Scope is important as it is related to data visibility.
In the example above the Scope for variable pyLoadedFile is Do
This means the variable is visible ONLY to activities within the Do routine
If you try and use the variable in say a sequence inside the IF routine, you will get an error as the variable will not be visible/accessible.
If you want a variable to be visible outside its immediate routine, then change the scope to the higher routine – in our example it would be Sequence.
You may also see there are several routines called Sequence, to distinguish between them you may need to rename them for clarity.

Lastly, we now need to use the Get The Python Object – this simply brings across the actual data from our Method/Function and puts it into a variable.
Drag the Get The Python Object activity under the Invoke Python method
When we use the Get The Python Object activity, the resulting data will end up being a string (our completed sentence), so we need to create a new variable to hold this returned string value, let us call it str_result.
The Python Object we are referencing is the output of the previous Invoke Python Method (result).
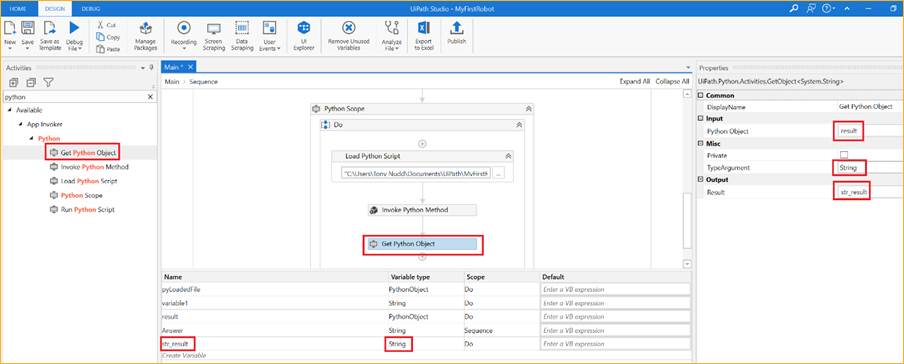
So, the properties for Get The Python Object are:
Python Object: result (do NOT use double quotes here, because we are using a variable name)
TypeArgument: String (because the returned data from the method/function is a text sentence)
Result: str_result (do NOT use double quotes here, because we are using a variable name)
So we now have our created sentence as a string held in a variable called str_result
Finally add a Message Box, set the property Text to str_result

1. Run
the robot
2. Answer
the question (yes or no)
3. Listen
to the voice answer
4. Click
OK after reading the text answer
5. Answer
the request for something else you love e.g. Soup
6. The
robot will call your Python Function, pass your chosen thing. The Custom
function will create a new sentence and send the final sentence back to the
robot.
7. The robot will display the final sentence.
(Optional, you could try adding the Text To Speech (TTS) Activity and have the robot say the sentence).
|
|
What was covered in this section |
How to add the UiPath Python Activities Package.
How to use the UiPath Python Activities
How to create a Python Object variable
|
|
Test your knowledge |
1. What
is the button called in UiPath Studio to allow you to add more Activities?
2. What
are the four main Python Activities used to call a Python Function (Method)?
3. What
is the typical order of the four main Python Activities in a UiPath robot prpject
when calling a Python Function (Method)?
4. What
is the variable type used to interact with Python in the UiPath Python
Activities?
5. What
is the difference between theValue = “myData” and theValue = myData
6. You are trying to use a variable you created earlier, but it does not show up in the routine you are currently in, why might this be?
|
|
Interesting Fact An average person normally blinks 20 times a minute, but when using a computer, he/she blinks only 7 times a minute.
|

Congratulations – we have all the basics in place
But the robot is not very intelligent – it is performing basic activities.
In the next workshop, we will add Artificial Intelligence (AI) to our project by exploring Machine Learning (ML) with Python, which together with the UiPath Robot will make intelligent decisions.
Icons – The icons used in this document were taken from img.pngio.com
Python – All references and images regarding Python belong to www.python.org
UiPath - All references and images regarding UiPath belong to www.uipath.com
Chrome - All references and images regarding Google Chrome belong to www.google.com
MS Office - All references and images regarding Word, Excel and Microsoft Office Google Chrome belong to www.microsoft.com